
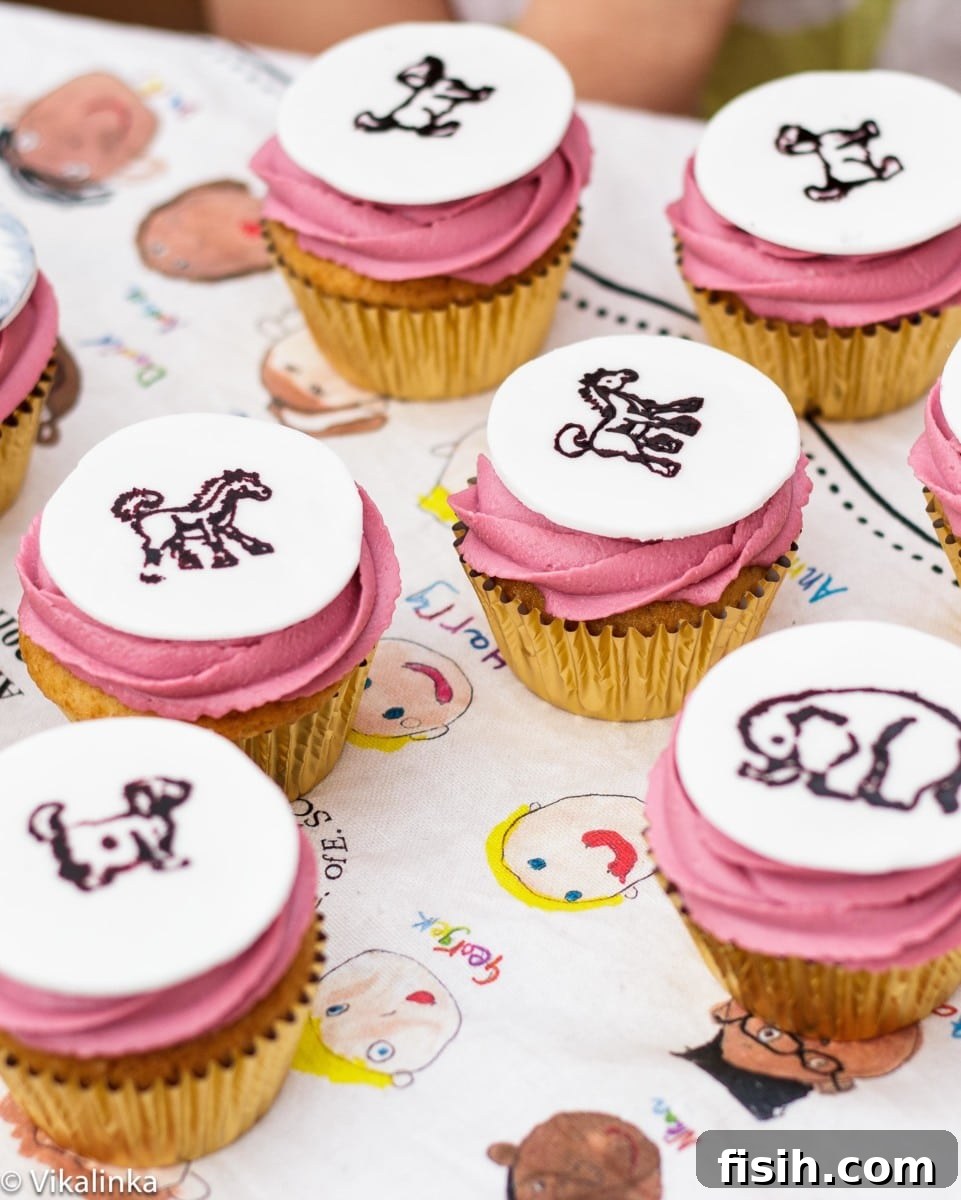
Delightful Hand-Stamped Birthday Cupcakes with Mascarpone Frosting
Transform any celebration into an enchanting event with these utterly adorable and customizable birthday cupcakes! Perfect for bringing immense joy to your little ones and their friends, these homemade treats are not just delicious but also a canvas for your creativity. Every parent knows the special feeling of crafting something unique for their child’s birthday, and this year, we’re diving into a project that combines simple baking with an ingenious decorating technique: hand-stamped fondant toppers. Forget the stress of elaborate cake designs; these charming cupcakes offer a heartwarming, personalized touch that will be remembered long after the party ends.
The Sweet Inspiration Behind the Creation
For me, children’s birthdays are an annual tradition of love, creativity, and a touch of delightful challenge. Each year, my kids present me with a new, often ambitious, request – whether it’s a Sonic the Hedgehog cake or a Hello Kitty masterpiece. While the initial thought might be daunting, a little research, a sprinkle of trial and error, and a whole lot of passion always lead to something truly special that we all cherish. This year, my daughter Vika, a vibrant animal lover with a particular fondness for puppies, couldn’t quite decide on a single cake theme. The pressure was on, and I was searching for that perfect spark of inspiration that would resonate with her unique personality.
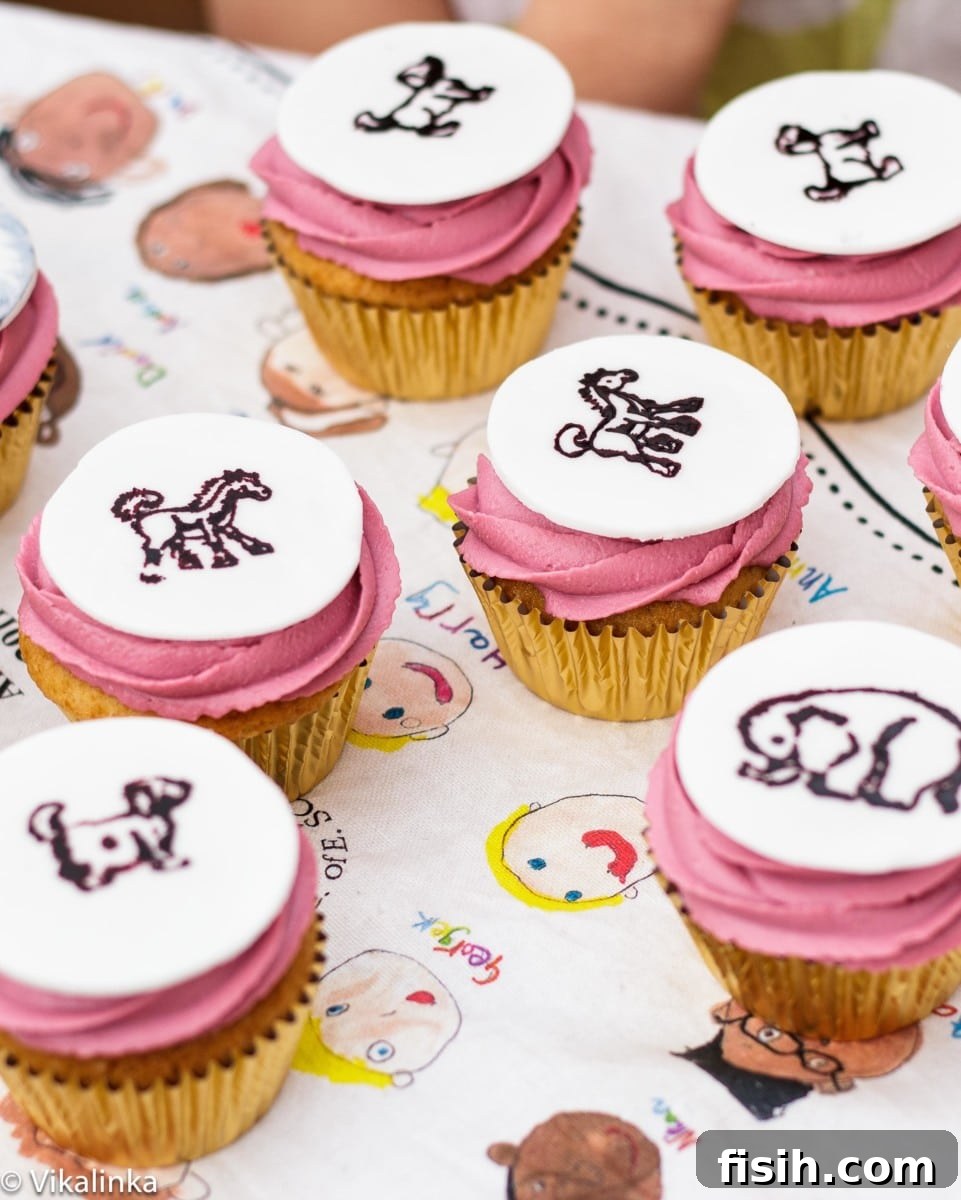
That spark arrived when I stumbled upon the incredible work of Sweetapolita, a true maestro in the world of cakes and confections. Her blog is my go-to for innovative and beautiful baking ideas. It was there that I discovered an absolutely brilliant technique: hand-stamped cupcakes. The concept was simple yet revolutionary – using rubber stamps to create adorable, intricate designs on fondant toppers. Given Vika’s love for animals, this was an instant “aha!” moment. I envisioned a collection of cupcakes, each featuring a different sweet creature, reminiscent of a child’s own drawings, whimsical and full of heart. The beauty of this technique lies in its incredible versatility; with a variety of stamps, you can create endless themes and never repeat a design, ensuring every batch feels fresh and exciting.
The Joy of Seeing it Come to Life
The moment I saw these birthday cupcakes come to life, and more importantly, the sheer excitement and pure joy in my daughter’s eyes, all the effort felt incredibly worthwhile. These whimsical creations were perfectly suited for a little girl’s birthday party. Each carefully stamped animal design on the fondant medallions evoked a sense of childlike wonder and creativity, almost as if they were sketched right from a storybook. Don’t you agree? To add another layer of personal charm to the party, the backdrop for some of these photos was a custom-made tea towel featuring “self-portraits” drawn by the children in Vika’s class. It was a beautiful way to celebrate not just Vika, but all her friends too. Here’s a glimpse of Vika’s charming contribution to the tea towel: 🙂
Crafting Adorable Fondant Cupcake Toppers
While you can certainly adapt any favorite cupcake and frosting recipe for this project, the true magic lies in the delightful fondant toppers. To create these intricate designs, you will need a few key tools: ready-to-use fondant, a selection of rubber stamps (choose themes that resonate with your celebration!), paste food colors, and a small, fine-tipped paintbrush. If you’ve ever used rubber stamps for crafting, you’ll master this technique in no time. For those new to it, it’s an incredibly satisfying and surprisingly simple skill to pick up.
Preparing Your Fondant Medallions (A Day or Week Ahead)
Planning is key for perfect fondant toppers, as they need ample time to dry. Start by preparing your medallions a day or even a week in advance to ensure they are firm and ready for stamping. On a clean, flat surface lightly dusted with icing sugar (confectioners’ sugar), roll out your fondant as thinly and evenly as possible. Fondant can be quite sticky, so don’t be shy with the dusting sugar to prevent it from adhering to your work surface or rolling pin. Using a round cookie cutter or a small glass, cut out medallions that will fit neatly on top of your baked cupcakes.
Carefully transfer the cut fondant circles to a parchment-lined tray or wire rack. Allow them to dry overnight, or even longer if needed, in a dry, room-temperature environment. Living in England, I’ve often battled with humidity, which can make drying fondant a challenge! In particularly damp conditions, a small dehumidifier in the room can work wonders to draw out moisture and ensure your toppers become crisp and firm. Properly dried toppers hold their shape and take the stamp impression beautifully, preventing smudging.
The Art of Stamping Your Fondant
Once your fondant toppers are completely dry and firm, it’s time for the fun part: stamping! Select your desired paste food color – I used a lovely Dusky Pink by Sugarflair, perfect for a whimsical touch. Mix just a tiny drop of water into a small amount of the paste color to create a paint-like consistency. You want it fluid enough to transfer, but not so watery that it bleeds. Using your small paintbrush, carefully “paint” the raised surface of your chosen rubber stamp with the diluted food color. Ensure an even, thin coat of color over the design.
Gently but firmly press the painted stamp onto the center of each dried fondant medallion. Apply even pressure and hold for a second or two to allow the color to transfer cleanly. Lift the stamp straight up to reveal your beautiful design. Repeat for all your toppers, re-painting the stamp each time for a crisp impression. If you’d like a more detailed visual guide, Rosie of Sweetapolita has an excellent tutorial video on her website that beautifully demonstrates this technique. Practice on a few spare fondant pieces until you feel confident – you’ll quickly become a pro at this charming decorating method!
Baking the Perfect Vanilla Cupcakes
Every beautiful topper deserves an equally delicious base. This vanilla cupcake recipe yields moist, tender, and incredibly flavorful cupcakes, providing the perfect foundation for your decorative efforts. This recipe is adapted from Sweetapolita, ensuring a reliable and delightful result every time. {Makes 24 cupcakes}
Ingredients for the Cupcakes:
- Cake Flour – 2 1/2 cups (275 gr)
- Baking powder – 1 tbsp.
- Salt – 1/2 tsp.
- Kefir or Buttermilk (I used Kefir) – 1 cup
- Large Egg – 1 (at room temperature)
- Large Egg Whites – 2 (at room temperature)
- Vanilla Bean – 1 (seeds scraped out)
- Granulated Sugar – 1 1/2 cups
- Unsalted Butter – 8 tbsp (115 gr, at room temperature)
Method for Cupcakes:
- Preheat your oven to 325°F (160°C). Line two standard 12-cup muffin tins with paper liners.
- In a medium bowl, sift together the cake flour, baking powder, and salt. Sifting helps to aerate the flour and remove any lumps, ensuring a lighter texture.
- In a separate bowl, whisk together the kefir (or buttermilk), the whole egg, egg whites, and the fragrant vanilla bean seeds until well combined.
- In a large mixing bowl, using an electric mixer (stand mixer or hand mixer), beat the softened butter and granulated sugar together on medium-high speed until the mixture is light, pale, and fluffy. This can take about 3-5 minutes, creating tiny air pockets for a tender crumb.
- With the mixer on low speed, gradually add the flour mixture and the wet egg mixture to the butter-sugar mixture in alternating additions. Begin and end with the flour mixture, typically adding the flour in three parts and the wet mixture in two parts. Be careful not to overmix; mix just until combined. Overmixing can develop the gluten too much, resulting in tough cupcakes.
- Divide the cupcake batter evenly among the prepared muffin liners, filling each about two-thirds full. This allows room for the cupcakes to rise without overflowing.
- Bake for 15-17 minutes, or until a wooden toothpick inserted into the center of a cupcake comes out clean. The tops should be lightly golden and spring back when gently touched.
- Remove the cupcakes from the oven and let them cool in the muffin tins for a few minutes before transferring them to a wire rack to cool completely. Ensure they are fully cooled before frosting.
Creating Dreamy Mascarpone Frosting
This light and creamy mascarpone frosting perfectly complements the vanilla cupcakes, offering a less sweet and incredibly rich alternative to traditional buttercream. Its stability makes it ideal for piping, creating a beautiful base for your stamped fondant medallions.
Ingredients for Frosting:
- Mascarpone (chilled) – 8 oz (250 gr)
- Cream Cheese (chilled) – 8 oz (250 gr)
- Unsalted Butter (at room temperature) – 1/2 cup (125 gr)
- Icing Sugar (confectioners’ sugar) – 1 1/2 cups
- Vanilla Extract – 2 tsp.
- Paste Food Colour (Dusky Pink by Sugarflair, optional, if desired)
Method for Frosting:
- The key to a perfectly stiff and pipeable mascarpone frosting is the temperature of your ingredients. Ensure both your mascarpone and cream cheese are cold, straight from the fridge, while your butter is at a true room temperature (softened but not melted).
- In a food processor (or a stand mixer with the paddle attachment, or using a hand mixer), combine the chilled mascarpone, chilled cream cheese, room temperature butter, icing sugar, vanilla extract, and your chosen paste food coloring (if using).
- Pulse or mix on low speed just until the ingredients are combined and the frosting becomes smooth and creamy. It’s crucial not to overprocess this frosting, especially if using a food processor, as mascarpone and cream cheese can quickly separate and become runny when overworked. Stop as soon as it reaches a desirable, smooth consistency.
- If the frosting seems too soft, you can chill it in the refrigerator for 15-20 minutes to firm it up before piping.
Assembling Your Masterpiece: The Final Touches
With your perfectly baked cupcakes, creamy frosting, and charming stamped fondant medallions ready, it’s time to bring these delightful birthday cupcakes to life. This final step is quick, easy, and incredibly rewarding.
- Pipe the Frosting: Fit a piping bag with your favorite star tip (or any decorative tip you prefer). Fill the piping bag with the prepared mascarpone frosting. Starting from the outside edge of each cooled cupcake, pipe a swirl of frosting towards the center. Aim for a generous but stable swirl that will comfortably hold your fondant topper.
- Place the Medallions: Gently take each dried, stamped fondant medallion and carefully place it directly on top of the piped frosting. The frosting will act as a natural adhesive, holding the medallion securely in place.
- Arrange and Serve: Arrange your finished birthday cupcakes on a decorative platter or cupcake stand. Step back and admire your beautiful, personalized creations! These cupcakes are best enjoyed fresh, but can be stored in an airtight container in the refrigerator for a few days.
Each cupcake is a mini work of art, bursting with flavor and decorated with a unique, heartfelt design. The combination of moist vanilla cake, silky mascarpone frosting, and the whimsical hand-stamped fondant topper creates a truly unforgettable treat that will be the highlight of any birthday celebration.
Tips for Success and Customization
Making these birthday cupcakes is a rewarding experience, and here are a few extra tips to ensure your success and inspire further creativity:
- Make-Ahead Magic: The fondant toppers are your secret weapon for stress-free party prep. They can be made up to a week in advance and stored in an airtight container at room temperature. The cupcakes can be baked a day ahead, and the frosting can be prepared a few hours beforehand and kept chilled. This staggered approach makes assembly on party day a breeze!
- Varying Flavors: Feel free to experiment! While vanilla is a classic, you could easily adapt the cupcake recipe to lemon, chocolate, or even a fun sprinkle-filled “funfetti” version. For the frosting, consider adding different extracts like almond, mint, or even a touch of citrus zest for a fresh twist.
- Theme it Up: The beauty of rubber stamps is their endless variety. For a dinosaur enthusiast, use dinosaur stamps. For a budding astronaut, celestial stamps! For holidays, think snowflakes or hearts. The possibilities for personalization are truly limitless, allowing you to tailor your cupcakes to any theme or interest.
- Involve the Little Bakers: Older children can help with cutting out fondant circles, and even with the stamping (under supervision, of course!). Younger kids can assist with pouring ingredients or placing the finished toppers, making it a fun family activity.
- Storage: Once assembled, the cupcakes are best stored in an airtight container in the refrigerator due to the mascarpone frosting. Let them come to room temperature for about 15-20 minutes before serving for optimal taste and texture.
A Sweet Conclusion to Your Celebration
These hand-stamped birthday cupcakes are more than just a dessert; they are a labor of love, a creative expression, and a guaranteed source of smiles. The combination of homemade goodness with a personal, artistic touch makes them stand out from store-bought alternatives. Imagine the delight on your child’s face as they see a collection of cupcakes specifically designed with their favorite animals or characters in mind. It’s these small, thoughtful details that transform a simple birthday gathering into a cherished memory.
So, gather your ingredients, unleash your inner baker and crafter, and get ready to create something truly magical. These adorable, custom-made birthday cupcakes are waiting to bring cheer and a touch of whimsical charm to your next celebration. Give them a try – you’ll be amazed at how easy and rewarding it is to make such a big impact with a little stamp!