
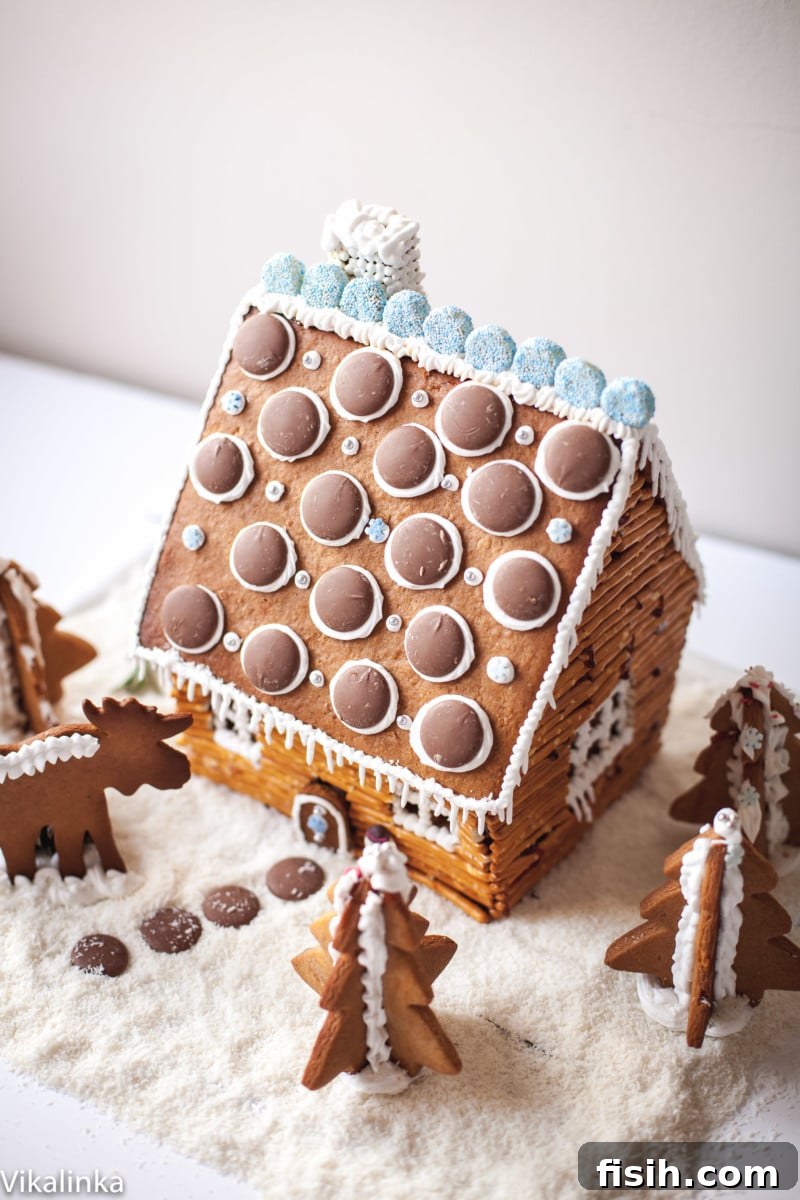
Creating Your Own Gingerbread Log Cabin: A Comprehensive Guide to Festive Baking and Decoration
There’s something truly magical about the aroma of gingerbread baking, especially during the festive season. For my family, making a gingerbread house isn’t just a holiday activity; it’s a cherished annual tradition, a ritual we wouldn’t miss for anything. Typically, our grand gingerbread construction project takes place on Christmas Eve, marking the unofficial start of the main celebrations. The entire process, always filled with laughter and a little bit of playful chaos, creates memories that last a lifetime.
Looking back at photos from previous years always brings a huge smile to my face. I vividly recall those sneaky little hands belonging to my children, subtly popping colorful sweets into their mouths, convinced they were being utterly discreet, rather than meticulously placing them on the house. Of course, the camera, ever watchful, catches every single delightful moment, preserving these fleeting instances of childhood joy and innocent mischief. These aren’t just houses; they are edible canvases for family stories and laughter.
While the tradition of building gingerbread houses has been a beloved staple in our home for many years, our approach had always been somewhat streamlined. We usually opted for convenient store-bought kits, which involved simply assembling the pre-baked pieces and then unleashing our creativity with the decorations. It was certainly fun and offered immediate gratification, but it lacked that deep satisfaction and sense of accomplishment that comes from a truly homemade creation.
Embracing the Challenge: From Kits to Crafting from Scratch
This particular year marked a delightful and exciting turning point. The esteemed brands OXO Good Grips and Stork teamed up to launch an ultimate blogger challenge: to bake a gingerbread house entirely from scratch and truly let our imaginations soar. This wasn’t just an invitation; it was an irresistible offer that promised to elevate our holiday baking experience. They generously provided all sorts of essential tools necessary for both baking and decorating, making the leap from pre-made kits to crafting from scratch seem not only feasible but incredibly exciting. This was my chance to delve deeper into the art of gingerbread architecture.
The prospect of designing and baking my own gingerbread house from the ground up filled me with immense excitement and a flurry of ideas. My mind immediately gravitated towards two distinct, yet equally enchanting, concepts: a rustic, charming Canadian log cabin or an intricately adorned Russian palace. Both held a certain allure, promising unique decorative possibilities and a chance to express different facets of holiday fantasy.
After a period of careful consideration, and a healthy dose of self-awareness regarding this being my very first attempt at baking a gingerbread house from scratch, I decided it was prudent to pace myself. I opted for something simpler, yet equally captivating – the rustic log cabin. This decision allowed me to focus on mastering the fundamental techniques of gingerbread baking and construction without getting overwhelmed by excessive architectural complexity. Sometimes, simplicity is key to success, especially when embarking on a new culinary adventure.
Bringing the Log Cabin to Life: Concept and Sourcing Decorations
Once the rustic log cabin concept was firmly in place, the next crucial step was to figure out the logistics of bringing it to life. How would I achieve the quintessential “log” look for the cabin walls? What additional elements would evoke a charming forest setting around it? And, most importantly, how could I incorporate a magnificent MOOSE, a true symbol of the Canadian wilderness, to complete the theme? These questions sent me on a delightful quest for inspiration and materials.
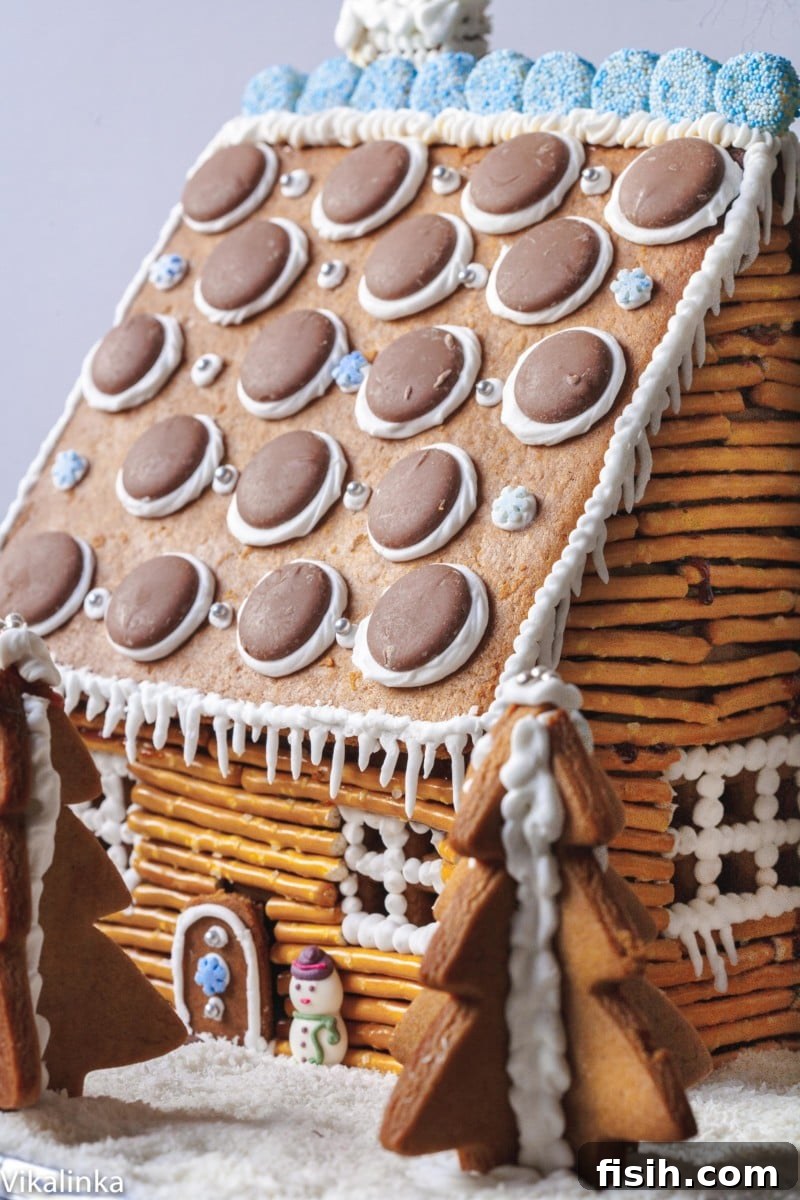
Thankfully, after just a few minutes of focused internet research for design ideas and a thorough inspection of my existing collection of cookie cutters, I discovered I had all the necessary components, or at least the inspiration, to craft these elements. Pretzel sticks would serve perfectly as miniature logs, giving the cabin its distinctive textured walls. Small tree-shaped cookie cutters would create edible forest elements, and to my delight, I found a charming moose-shaped cutter that would bring my wilderness scene to life. The vision was coming together beautifully.
The Perfect Gingerbread Recipe: Sturdy and Delicious
For the structural integrity of the house itself, I initially referenced a basic template from Martha Stewart. Her detailed instructions provided an excellent starting point. However, the accompanying recipe for the gingerbread dough required some thoughtful adaptation to suit my British readers and local ingredient availability. This primarily involved converting measurements to the metric system, which is standard in the UK, and substituting treacle for molasses, which is more commonly used and readily available in British supermarkets.
The result of these careful adjustments was nothing short of delightful. The gingerbread not only tasted wonderfully rich, spicy, and fragrant – embodying all the festive flavors we associate with this time of year – but it also proved to be exceptionally sturdy. This characteristic is absolutely crucial for any successful gingerbread house construction. A strong, unyielding gingerbread base is the foundation for a durable and impressive edible edifice, capable of holding its shape and supporting numerous, often heavy, decorations without crumbling or collapsing. This robust dough became the backbone of my log cabin vision.
The Secret to Sturdy Construction: Hot Caramel Adhesive
Traditionally, gingerbread houses are “glued” together with royal icing. While effective and beautiful for intricate details, royal icing can take an incredibly long time to dry and set, often requiring hours of patience, especially in humid climates like England. This extended drying time can make the assembly process even trickier and more prone to collapse, testing even the most patient bakers. I was determined to find a method that offered greater stability and reduced fragility – something truly fail-proof for a first-time scratch builder who valued efficiency and structural integrity.
My extensive research led me to an ingenious alternative: hot caramel. And once again, I owe a huge thank you to Martha Stewart for popularizing this brilliant discovery! The process is surprisingly simple: merely melt a cup of granulated sugar with the juice of half a lemon in a small saucepan, and voilà! You have a powerful, fast-setting adhesive that hardens almost instantly. However, a word of extreme caution, which I cannot stress enough: under absolutely no circumstances should you touch the hot caramel directly with your bare hands.
Seriously, just DON’T DO IT. Unless, of course, you’re secretly aspiring to a career as a spy, and erasing your fingerprints is merely your first step. Trust me on this; I’m halfway there with my still-healing fingertips. The excruciating pain of my burned blisters serves as a vivid, albeit painful, reminder. It’s not inherently dangerous if handled correctly and with extreme caution, but please, do not be careless, and whatever you do, don’t make the same impulsive mistake I did!
The truly unfortunate and almost comical part of my caramel mishap is that I had verbally reminded myself, out loud like a crazy person talking to myself, not to touch the hot caramel. Yet, in the exhilarating flurry and intense concentration of the gingerbread-making process, I completely forgot my own warning and impulsively did exactly what I shouldn’t have. The agony was instant and intense, momentarily derailing my festive spirit.
This entire blog post, and indeed the completion of the gingerbread house itself, might not have come to fruition if it weren’t for my wonderful friend, Carmen. She was on her way to my house to help me decorate, as her artistic flair is simply incredible – I’d specifically asked her to join me for the creative, fun part. Just as she was en route, I texted her in a sheer panic, explaining I’d badly burned myself! She rushed over, rescued me from my self-inflicted predicament, and heroically finished assembling the house while I hovered nearby, clutching an ice pack for two agonizing hours. Thankfully, the initial throbbing pain eventually subsided enough for me to participate in the most enjoyable part of the whole endeavor: the decorating!
Despite my personal misadventure, the advantages of using hot caramel as an adhesive far outweigh any perceived “danger,” provided you exercise extreme caution and follow safety protocols. The house becomes permanently “glued” together with remarkable speed, literally taking minutes to set and create a rock-solid structure. I employed hot caramel not only for assembling the main structural components of the house but also for meticulously attaching the pretzel sticks to the walls, creating that authentic, rustic log cabin look. If you don’t fully trust yourself with direct application, consider using a heat-resistant brush for precise application and wearing protective gloves. This particular construction step is definitively for adults only – prioritize safety above all else to avoid any festive mishaps!
Rustic Gingerbread Log Cabin Recipe
Julia Frey of Vikalinka
Print Recipe
Learn how to craft a beautiful and sturdy gingerbread log cabin from scratch with this detailed tutorial and recipe. Perfect for a festive family activity that brings holiday cheer!
Ingredients
For the Gingerbread House Dough
- 250 g margarine (such as Stork)
- 200 g demerara sugar
- 7 tbsp golden syrup
- 600 g plain flour
- 2 tsp bicarbonate of soda
- 4 tsp ground ginger
- 2 tsp cinnamon
- 1 tsp mixed spice
For the Royal Icing
- 3 egg whites
- 1/2 tsp cream of tartar
- 500 g icing sugar, sifted
For the Hot Caramel Adhesive (Adults Only!)
- 225 g granulated sugar
- Juice of 1/2 lemon
For Decorations
- Pretzel sticks (for log cabin walls)
- Giant chocolate buttons (for roof tiles or windows)
- Silver balls (for festive accents or snow)
- Liquorice (for details like door frames or window panes)
- Assorted sweets of your choice (gumdrops, candy canes, M&Ms, jelly beans, sprinkles, etc.)
- Desiccated coconut (for a realistic snow effect)
- Chocolate chips (for various details)
- Edible glitter (for a touch of sparkle)
- Gingerbread cookie cut-outs (trees, moose, bears, etc.)
Instructions
Preparing the Gingerbread House Dough
- Preheat your oven to 180°C (350°F / Gas Mark 6). Prepare several baking sheets by lining them with parchment paper.
- In a medium saucepan, gently melt the margarine, demerara sugar, and golden syrup over low heat until fully combined and smooth. Remove the pan from the heat and set aside to cool slightly.
- In a large mixing bowl, combine the plain flour, bicarbonate of soda, ground ginger, cinnamon, and mixed spice. Whisk these dry ingredients together thoroughly to ensure they are well distributed.
- Pour the slightly cooled melted margarine mixture into the dry ingredients. Stir well with a sturdy spoon or a stand mixer with a dough hook until a firm, cohesive dough forms. Ensure there are no dry patches of flour.
- Wrap the gingerbread dough tightly in cling film and chill it in the fridge for at least 1 hour. This crucial step helps the dough firm up, making it much easier to roll and cut precise shapes.
- Once chilled, unwrap the dough. On a clean work surface covered with a fresh sheet of parchment paper, roll out about one quarter of the dough to a consistent thickness of approximately 0.6 cm (1/4 inch). Avoid rolling it too thin, as this can make the house fragile.
- Using your chosen templates (which can be downloaded online or crafted from cardboard), carefully cut out one section of the house (e.g., a wall or a roof panel). Carefully slide the gingerbread piece, still on its parchment paper, onto a prepared baking sheet. Repeat this process with the remaining dough, re-rolling any trimmings, until you have two side walls, a front wall, a back wall, two roof panels, and any chimney pieces or additional decorations like gingerbread trees or a moose figure.
- Bake in the preheated oven for approximately 15 minutes, or until the gingerbread pieces are golden brown around the edges and firm to the touch. Baking times may vary depending on the thickness of your gingerbread and the specific calibration of your oven.
- Immediately after removing the gingerbread parts from the oven, while they are still hot and pliable, place your original templates over them. Using a sharp knife, carefully trim any expanded edges to ensure the pieces are precisely the original size of your templates. This step is vital for ensuring a perfect, snug fit during assembly.
- Allow all baked gingerbread pieces to cool completely on a wire rack until they are hard and crisp. Do not attempt to assemble while warm, as the pieces may warp or break.
Making and Using the Hot Caramel Adhesive
- Pour the granulated sugar and the juice of half a lemon into a small, heavy-bottomed saucepan. Set it over medium heat.
- DO NOT STIR initially. Allow the sugar to start bubbling around the edges. Once you see significant bubbling, you can gently stir with a heat-resistant spatula or wooden spoon until the sugar is completely dissolved and the mixture begins to turn an amber colour.
- Continue cooking, without stirring excessively, until the caramel reaches a rich, deep amber hue. Be vigilant as it can burn very quickly if left unattended.
- Immediately remove the saucepan from the heat. The caramel will be extremely hot and can reach very high temperatures.
- IMPORTANT SAFETY WARNING: Exercise extreme caution. Hot caramel can cause severe burns. Ensure children, pets, and anyone not directly involved in this step are kept far away. Always use heat-resistant gloves and a small, heat-resistant brush for application. This step is strictly for ADULTS ONLY. Have a bowl of ice water nearby in case of minor splatters, but seek immediate medical attention for any significant burns.
- To assemble the house, carefully brush a thin, even layer of the hot caramel onto the edges or seams of two gingerbread pieces you wish to join. Press the pieces together firmly and hold them in place for about 1 minute, or until the caramel cools and hardens, creating a strong, instant bond.
- Start by assembling the four walls of the house. Once the walls are stable, carefully attach the roof panels. Finish by adding the chimney pieces and any other large structural elements. Work efficiently as the caramel will harden quickly.
- Once assembled, carefully place your finished gingerbread house on a large cookie sheet, sturdy cutting board, or your chosen serving platter. Covering the base with aluminum foil beforehand can make cleanup and presentation easier.
Preparing and Using the Royal Icing for Decoration
- To make the royal icing, in a large, clean bowl (preferably glass or metal), combine the egg whites with the cream of tartar. Using a hand mixer or a stand mixer with the whisk attachment, beat the mixture on medium speed until it becomes frothy and slightly aerated.
- With the mixer still running on low speed, gradually begin adding the sifted icing sugar, about half a cup at a time. Continue whipping until all the sugar is incorporated and the icing becomes very stiff, holding firm peaks. The icing should be thick enough to pipe intricate details without spreading.
- Transfer a portion of the royal icing into a pastry bag fitted with your desired decorating tip (e.g., a small round tip for details, a star tip for texture). To prevent the remaining icing in the bowl from drying out, cover it directly with cling film, pressing it onto the surface of the icing to eliminate air exposure.
- To keep the tip of your pastry bag from hardening between uses, you can keep it in a small glass with a tiny amount of water. Just be sure to wipe the tip dry before continuing to pipe.
- Now for the fun part: unleash your imagination to decorate your gingerbread house! Use the royal icing to create charming snow drifts, delicate icicles hanging from the roof, intricate window frames, door details, or to “glue” smaller candies onto the house for added sparkle and color.
- To create a beautiful snow-covered effect, generously sprinkle desiccated coconut all around the base of the house and gently dust some on the roof. Use more royal icing to secure gingerbread trees, moose cut-outs, or any other objects around the house to craft a charming and personalized winter scene.
Notes and Tips for Success
* Template Usage: Ensure your templates are accurate, sturdy, and clearly marked. Cardboard or thick paper works best. Cut out multiple copies if needed for ease of use during the trimming step.
* Dough Consistency: If your dough feels too sticky after chilling, add a little more flour, one tablespoon at a time, until it’s manageable. If it’s too crumbly, add a tiny bit more golden syrup or margarine. It should be firm but pliable and easy to roll without sticking excessively.
* Baking Uniformity: Try to bake pieces of similar thickness together on the same sheet to ensure even baking. For consistent results, rotate your baking sheets halfway through the baking time.
* Precision Trimming: Trimming the hot gingerbread pieces immediately after baking is absolutely critical. Gingerbread dough expands slightly in the oven, and precise, sharp edges are essential for a stable and aesthetically pleasing house. Work quickly and carefully with a sharp knife or pizza cutter.
* Caramel Safety: As reiterated, please be extremely careful with hot caramel. For minor burns, run under cold water immediately. For anything significant, seek immediate medical attention. If you are hesitant about using caramel, a very thick, stiff royal icing can also be used for assembly, but be prepared for significantly longer drying times (often overnight) and potentially less structural integrity.
* Decoration Variety: Don’t limit yourself to the suggestions provided! Think beyond basic candies. Mini chocolate bars can make great doors, cereal squares can be charming roof shingles, and even fresh rosemary sprigs can act as miniature evergreen trees for a natural touch. Small marshmallows can create fluffy snowdrifts.
* Family Fun: While the caramel assembly is strictly for adults, decorating is a fantastic activity for all ages. Assign different roles, provide plenty of options, and enjoy the collaborative creative process. It’s truly a memorable family bonding experience!
* Storage: A finished gingerbread house, if kept in a cool, dry place away from direct sunlight and humidity, can last for several weeks, if not longer. While the gingerbread is edible, its primary purpose often shifts to being a festive decoration after a few days.
* Use this chart to convert from metric into imperial system if you prefer imperial measurements.
Nutrition information is automatically calculated, so should only be used as an approximation.
Making Memories, One Gingerbread House at a Time
Creating a gingerbread house from scratch, especially one as charming and personal as this rustic log cabin, is an incredibly rewarding experience. It transforms a simple baking project into a cherished holiday memory that will be talked about for years to come. The journey from conceptualizing the design and adapting the perfect sturdy gingerbread recipe to the slightly chaotic, yet ultimately triumphant, assembly with hot caramel and the joyous explosion of decorating with a dear friend, makes the entire effort worthwhile. It’s more than just a dessert; it’s a centerpiece of holiday spirit, a testament to creativity, and a vessel for invaluable family bonding.
Whether you’re a seasoned baker or attempting your very first homemade gingerbread house, I wholeheartedly encourage you to embark on this delightful tradition. Don’t be afraid to experiment with different designs, personalize your decorations, and most importantly, truly enjoy every step of the process. Every little detail, from the carefully placed pretzel logs to the whimsical candy decorations, contributes to a unique piece of edible art that will bring warmth, cheer, and a touch of magic to your home during the festive season. So gather your ingredients, enlist your helpers (especially artistic ones!), and get ready to build your own gingerbread masterpiece. Happy baking and happy holidays!